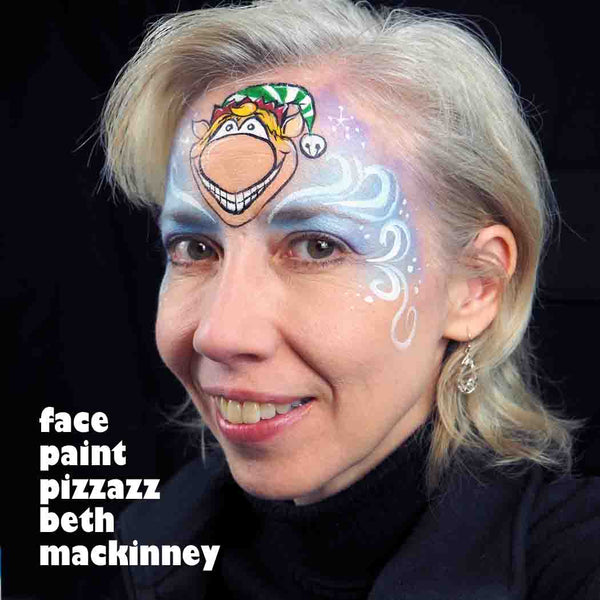
If you're looking for a mischievous elf design to wear to your Christmas events, here's one just for you. He's sure to make the kids in your chair smile at you. Or paint him on a party guest and let him bring Christmas cheer everywhere he goes at the event.
Materials
• Skin tone (TAG palette)
• Pearl light blue (TAG)
• Light blue (Paradise)
• Pearl light purple (TAG)
• Pearl purple (TAG)
• Black face paint (Diamond FX)
• White face paint (Wolfe)
• Green face paint (TAG)
• Red face paint (Paradise)
• Silver face paint (Paradise)
• Small filbert brush (SillyFarm)
• Small round brush #2 (Loew Cornel gold grip)
• Medium round brush #4 (Mark Reid)
* Sponge
* Cosmetic grade glitter (optional)
Tutorial
Begin by loading your small filbert brush with the skin tone you'd like to use for your elf. Ideally it will be a little lighter or a little darker than your own skin tone so it stands out just a bit on your face, depending on your own skin tone. This isn't necessary, but it makes it easier to find the edges later. I also dipped the side of my brush in a darker skin tone to add a little shadow on the edges of the face of the elf. Add a large nose and the cheeks and jaw. With a #2 round brush, add white for the grinning teeth below the nose and two eye shapes above the nose for the eyes. (Also give your elf some pointy ears.)

I found it easiest to sketch out the white of the elf hat before I used the darker color. White is very forgiving and easy to wipe off, so I recommend this, although you don't have to make the hat striped. You could also make it entirely green or red. With the small #2 round brush, also add a little hair in yellow or whatever color you prefer. (I used yellow because it wasn't a color I was using in any other part of the design.)

Fill in the green stripes with your small round brush. Also add the zigzag red above the hair. Add a small silver circle to the end of the hat where the bell will be.

Sponge some light blue and pearl blue over the eyelids and around the elf, blending it with light purple and medium purple toward the hairline.

Again using your small round brush (a #1 if you're not comfortable with a #2), stay up on the tip and outline with black. I use Diamond FX black for this purpose because it flows well for a black liner, but you could also use Wolfe, Global, or Cameleon. There are many good choices for lining blacks.

Use the #4 round brush and white to add swirls and snow to your big nose buddy elf mask. Finish up with white highlights on the elf and you are finished.

Enjoy your Christmas elf!

Beth MacKinney is the owner of and primary face painter for Face Paint Pizzazz in Elgin, Illinois, and her artwork has appeared in The Colored Palette and SkinMarkz magazines. She services the western and northwestern Chicago suburbs, Chicago’s north side, and the eastern and southeastern suburbs of Rockford. Stop by Clownantics.com to enjoy more of Beth’s face painting tutorials.